[root@centos7 jy576]# docker run --rm -it -v gitlab-runner-config:/etc/gitlab-runner gitlab/gitlab-runner:latest register Runtime platform arch=amd64 os=linux pid=7 revision=943fc252 version=13.7.0 Running in system-mode. Enter the GitLab instance URL (for example, https://gitlab.com/): http://gitlab.feiyang.com/ Enter the registration token: kXmj4UA9Z2_NL2sa2Z6z Enter a description for the runner: [43420abf216d]: centos7 Enter tags for the runner (comma-separated): ci,ssh ERROR: Registering runner... failed runner=kXmj4UA9 status=couldn't execute POST against http://gitlab.feiyang.com/api/v4/runners: Post http://gitlab.feiyang.com/api/v4/runners: dial tcp: lookup gitlab.feiyang.com on 8.8.8.8:53: no such host PANIC: Failed to register the runner. You may be having network problems. [root@centos7 jy576]# docker run --rm -it -v gitlab-runner-config:/etc/gitlab-runner gitlab/gitlab-runner:latest register Runtime platform arch=amd64 os=linux pid=8 revision=943fc252 version=13.7.0 Running in system-mode. Enter the GitLab instance URL (for example, https://gitlab.com/): http://192.168.64.3/ Enter the registration token: kXmj4UA9Z2_NL2sa2Z6z Enter a description for the runner: [a7068d34147b]: centos7 Enter tags for the runner (comma-separated): ci,ssh Registering runner... succeeded runner=kXmj4UA9 Enter an executor: custom, virtualbox, docker+machine, docker, docker-ssh, parallels, shell, ssh, docker-ssh+machine, kubernetes: docker Enter the default Docker image (for example, ruby:2.6): python:3.9.1-slim-buster Runner registered successfully. Feel free to start it, but if it's running already the config should be automatically reloaded! [root@centos7 jy576]# docker ps CONTAINER ID IMAGE COMMAND CREATED STATUS PORTS NAMES 926cd5798468 gitlab/gitlab-runner:latest "/usr/bin/dumb-init …" 7 minutes ago Up 7 minutes gitlab-runner
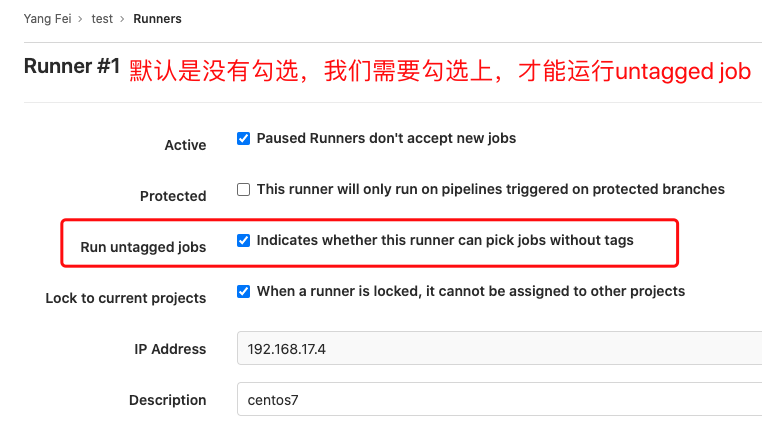
回到网页端,我们需要修改一下 runner 设置,勾选上 Run untagged jobs
因为我们是自定义域名,所以我们需要在 gitlab-runner 里面进行设置,否则 CI job 无法 pull
1 2 3 4 5 6 7 8 9 10 11 12 13 14 15 16 17
Running with gitlab-runner 13.7.0 (943fc252) on centos7 FSX9yRiU Preparing the "docker" executor 00:04 Using Docker executor with image python:3.9.1-slim-buster ... Pulling docker image python:3.9.1-slim-buster ... Using docker image sha256:b55839ea7a0e9bb534237d00558cb96dce4013bf7f1092966fe0e27e98f8179f for python:3.9.1-slim-buster with digest python@sha256:4d92968b26bb6b7b62d957244de86fc1054f03793577d49e85c00864eb03ca07 ... Preparing environment 00:01 Running on runner-fsx9yriu-project-2-concurrent-0 via 926cd5798468... Getting source from Git repository 00:00 Fetching changes with git depth set to 50... Initialized empty Git repository in /builds/feiyang/test/.git/ Created fresh repository. fatal: unable to access 'http://gitlab.feiyang.com/feiyang/test.git/': Could not resolve host: gitlab.feiyang.com ERROR: Job failed: exit code 1
Running with gitlab-runner 13.7.0 (943fc252) on centos7 FSX9yRiU Preparing the "docker" executor 00:05 Using Docker executor with image python:3.9.1-slim-buster ... Pulling docker image python:3.9.1-slim-buster ... Using docker image sha256:b55839ea7a0e9bb534237d00558cb96dce4013bf7f1092966fe0e27e98f8179f for python:3.9.1-slim-buster with digest python@sha256:4d92968b26bb6b7b62d957244de86fc1054f03793577d49e85c00864eb03ca07 ... Preparing environment 00:00 Running on runner-fsx9yriu-project-2-concurrent-0 via 926cd5798468... Getting source from Git repository 00:01 Fetching changes with git depth set to 50... Reinitialized existing Git repository in /builds/feiyang/test/.git/ Checking out b60b95c1 as master... Removing ip.json Skipping Git submodules setup Executing "step_script" stage of the job script 00:00 $ pwd /builds/feiyang/test $ cd /builds/$CI_PROJECT_NAMESPACE/$CI_PROJECT_NAME && python lint.py feiyang test CI /builds/feiyang/test Job succeeded
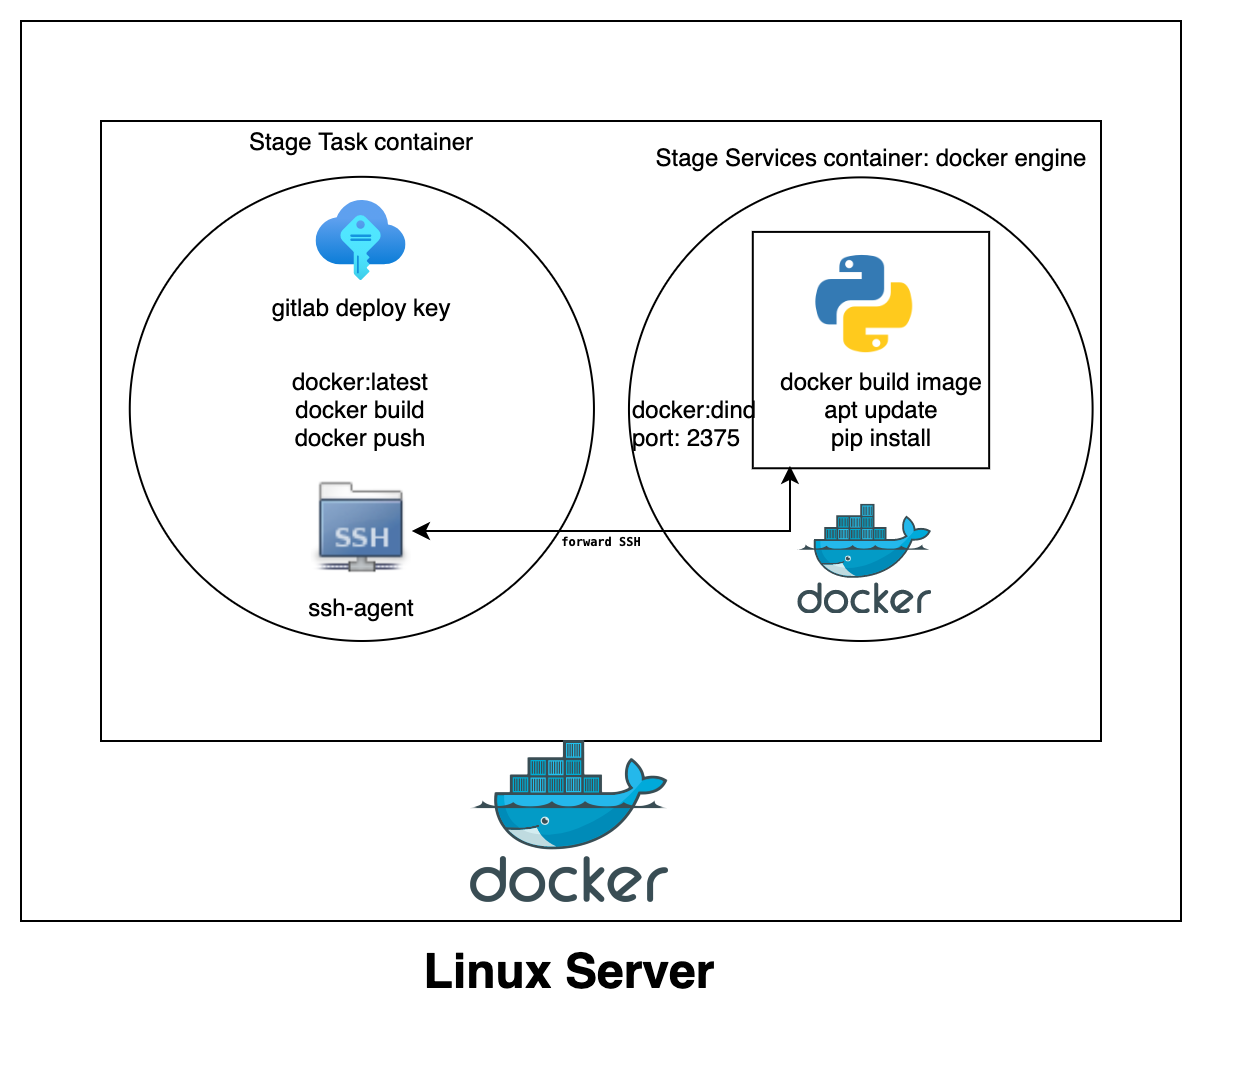
root@ubuntu20:~# docker ps CONTAINER ID IMAGE COMMAND CREATED STATUS PORTS NAMES ad978e3c9250 dc8c389414c8 "dockerd-entrypoint.…" 16 seconds ago Up 15 seconds 2375-2376/tcp runner-supzrn4b-project-2-concurrent-0-ef2ee4c879673f88-build-2 dea3a81e5209 gitlab/gitlab-runner:latest "/usr/bin/dumb-init …" 4 months ago Up 46 minutes gitlab-runner root@ubuntu20:~# docker exec -it ad978e3c9250 sh / # ps -ef PID USER TIME COMMAND 1 root 0:00 /bin/sh 17 root 0:00 /bin/sh 27 root 0:00 sleep 120 28 root 0:00 sh 34 root 0:00 ps -ef / # env | grep DOCKER_HOST CI_COMMIT_TITLE=export DOCKER_HOST=tcp://127.0.0.1:2375 CI_COMMIT_MESSAGE=export DOCKER_HOST=tcp://127.0.0.1:2375 / # export DOCKER_HOST=tcp://127.0.0.1:2375 / # env | grep DOCKER_HOST CI_COMMIT_TITLE=export DOCKER_HOST=tcp://127.0.0.1:2375 DOCKER_HOST=tcp://127.0.0.1:2375 CI_COMMIT_MESSAGE=export DOCKER_HOST=tcp://127.0.0.1:2375 / # dockerd --host=unix:///var/run/docker.sock --host=tcp://0.0.0.0:2375 INFO[2021-06-02T15:20:31.852225191Z] Starting up WARN[2021-06-02T15:20:31.853254325Z] could not change group /var/run/docker.sock to docker: group docker not found WARN[2021-06-02T15:20:31.853700852Z] Binding to IP address without --tlsverify is insecure and gives root access on this machine to everyone who has access to your network. host="tcp://0.0.0.0:2375" WARN[2021-06-02T15:20:31.853771630Z] Binding to an IP address, even on localhost, can also give access to scripts run in a browser. Be safe out there! host="tcp://0.0.0.0:2375" WARN[2021-06-02T15:20:32.857263870Z] Binding to an IP address without --tlsverify is deprecated. Startup is intentionally being slowed down to show this message host="tcp://0.0.0.0:2375" WARN[2021-06-02T15:20:32.857418830Z] Please consider generating tls certificates with client validation to prevent exposing unauthenticated root access to your network host="tcp://0.0.0.0:2375" WARN[2021-06-02T15:20:32.857466269Z] You can override this by explicitly specifying '--tls=false' or '--tlsverify=false' host="tcp://0.0.0.0:2375" WARN[2021-06-02T15:20:32.857660544Z] Support for listening on TCP without authentication or explicit intent to run without authentication will be removed in the next release host="tcp://0.0.0.0:2375" INFO[2021-06-02T15:20:47.860746924Z] libcontainerd: started new containerd process pid=48 INFO[2021-06-02T15:20:47.860803013Z] parsed scheme: "unix" module=grpc INFO[2021-06-02T15:20:47.860813924Z] scheme "unix" not registered, fallback to default scheme module=grpc INFO[2021-06-02T15:20:47.860830282Z] ccResolverWrapper: sending update to cc: {[{unix:///var/run/docker/containerd/containerd.sock <nil> 0 <nil>}] <nil> <nil>} module=grpc INFO[2021-06-02T15:20:47.860835997Z] ClientConn switching balancer to "pick_first" module=grpc INFO[2021-06-02T15:20:47.877826134Z] starting containerd revision=05f951a3781f4f2c1911b05e61c160e9c30eaa8e version=v1.4.4
Finally, share with you the gitlab ci yaml file
1 2 3 4 5 6 7 8 9 10 11 12 13 14 15 16 17 18 19
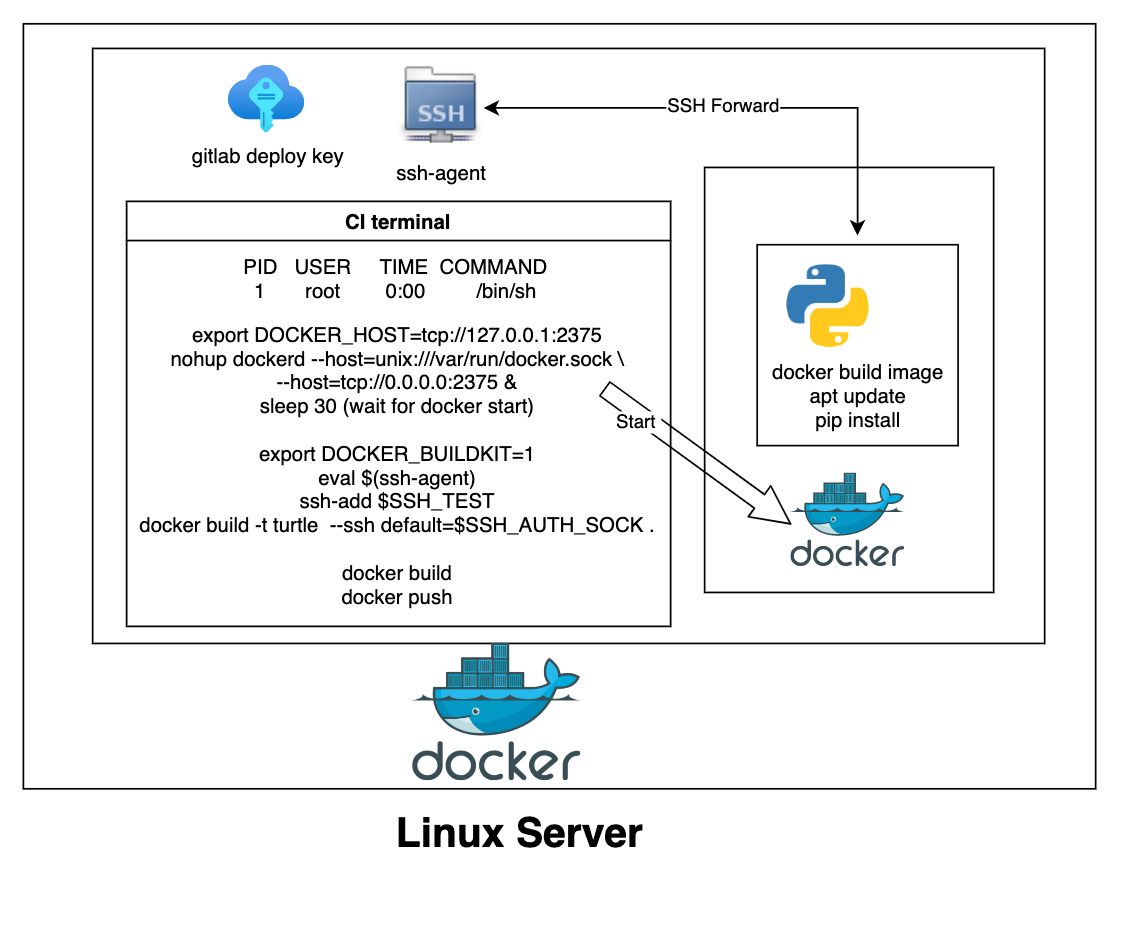
before_script: -apkadd--no-cachecurljqpython3py3-pipgit -mkdir-p-m0600~/.ssh -echo"[192.168.64.3]:2222 ecdsa-sha2-nistp256 AAAAE2VjZHNhLXNoYTItbmlzdHAyNTYAAAAIbmlzdHAyNTYAAABBBAs5kvb4yuBB1C5yJfyav7F13MCP5Z4BJpCYq403tz2G/eyUMzJUzW+/FIIlLAffnLZxqkLpKZterXD2Ahn9KvA=">>~/.ssh/known_hosts -chmod600$SSH_TEST -exportDOCKER_HOST=tcp://127.0.0.1:2375 -nohupdockerd--host=unix:///var/run/docker.sock--host=tcp://0.0.0.0:2375& -cp$SSH_TEST~/.ssh/id_rsa -sleep30# it's hard to set a best vaule